How to Create A 2D Tile-Based Game with JavaScript
 JavaScript
 In this tutorial, you'll learn how to create a 2D tile-based game with JavaScript! We'll walk through creating the player, a map, some keyboard controls, and some mechanics to control the viewport for a smooth gaming experience. The great thing about this is there are no third-party plugins or libraries. Just pure, vanilla JavaScript and a sprinkling of HTML and CSS.
Before we dive in, you can check out the game demo here, or just dive straight in and gain access to the full code base in the GitHub repository.
The game we'll be making looks like this:
The HTML
We have just a bit of HTML code to display the necessary elements. The canvas element contains our map, and the character display and animation, a div container showing our FPS (frames per second) and player position on the map. We top it off with our JavaScript dependency files that we'll walk through shortly:
<!DOCTYPE html>
<html>
<head>
	<title>2D Game</title>
	<link type="text/css" href="assets/css/main.css" rel="stylesheet" />
</head>
<body>
	<canvas id="game"></canvas>

	<div id="log">
		<div id="fps"></div>
		<div id="coords"></div>
	</div>

	<script src="assets/js/viewport.js"></script>
	<script src="assets/js/player.js"></script>
	<script src="assets/js/map.js"></script>
	<script src="assets/js/main.js"></script>
</body>
</html>
The CSS
Now, we'll create some styling for the page background and remove any unnecessary padding and margins from the html and body selectors. This will ensure that the game extends the entire browser viewport:
html, body {
	width: 100%;
	height: 100%;
	background-color: black;
	padding: 0px;
	margin: 0px;
}
Next, we'll style our canvas element to be fixed-positioned and stretch the entirety of the viewport horizontally and vertically:
canvas#game {
	width: 100vw;
	height: 100vh;
	position: fixed;
}
Finally, we'll create a div container to show the FPS (frames per second) count and horizontal and vertical tile position of the player on the map:
div#log {
	background: rgba(0, 0, 0, 0.90);
	font-family: Arial, sans-serif;
	font-size: 12pt;
	color: white;
	text-align: left;
	padding: 5px 9px;
	position: fixed;
	top: 20px;
	left: 20px;
	z-index: 2;
}
The JavaScript
Now it's time for the fun part! Let's dive into each code block and dissect it carefully to understand how everything works.
Main.js
This script contains the necessary functions to run the game, including global variables and the game loop.
Game Configuration
Let's set up our game configuration variables in an object called config:
var config = {
	win: {
		width: window.innerWidth,
		height: window.innerHeight
	},
	tiles: {
		x: Math.ceil(window.innerWidth / 64) + 2,
		y: Math.ceil(window.innerHeight / 64) + 2
	},
	center: {
		x: Math.round(window.innerWidth / 64) / 2,
		y: Math.round(window.innerHeight / 64) / 2
	},
	size: {
		tile: 64,
		char: 96
	},
	speed: 5
};
There are several objects and variables within the config object:
win: the width and height of the browser's viewport.tiles: the number of 64x64 pixel tiles that can fit within the viewport, with an offset of 2 to ensure there is overflow and no blank space.center: the horizontal and vertical center of the viewport in pixels.size: the horizontal and vertical size of the map and character tiles in pixels.speed: the walking speed of the player.
Keyboard Input
Now, we'll define the arrow keys used to control the player on the map:
var keys = {
	37: {
		x: -config.speed,
		y: 0,
		a: false,
		f: [6, 7, 8, 7]
	},
	38: {
		x: 0,
		y: -config.speed,
		a: false,
		f: [3, 4, 5, 4]
	},
	39: {
		x: config.speed,
		y: 0,
		a: false,
		f: [9, 10, 11, 10]
	},
	40: {
		x: 0,
		y: config.speed,
		a: false,
		f: [0, 1, 2, 1]
	}
};
The key codes are:
37: left arrow key38: up arrow key39: right arrow key40: down arrow key
And each of the variables within each arrow key object:
x: the distance, in pixels, the player will move on the x-axis.y: the distance, in pixels, the player will move on the y-axis.a: determines if the current key is pressed.f: the player animation frames to use from the sprite image. As the player moves, the frame used from the sprite image changes regularly until the arrow keys are released.
Here is the sprite image for the player depicting each animation frame available:
![]()
Remaining Global Variables
To tie up our global variable assignments, we'll create variables for the viewport, player, map, and canvas, and an object for the FPS display:
var viewport;
var player;
var map;
var context;

var fps = {
	count: 0,
	shown: 0,
	last: 0
};
The Game Setup
Now, let's create a custom function called Setup() that will create a pointer to the canvas, setup the viewport, and draw in the player and map:
function Setup() {
	context = document.getElementById("game").getContext("2d");
	viewport = new Viewport(0, 0, config.win.width, config.win.height);
	player = new Player(4, 3);
	map = new Map("Map");

	Sizing();

	setInterval(function() {
		fps.shown = fps.count;
	}, 1000);
}
The viewport object points to a custom class, Viewport, which we'll cover in a bit, and defines a display of the size of the browser's viewport using our pre-defined global config values.
The Sizing() function, another method we'll dive into shortly, is invoked to set the width and height of the window and canvas elements.
We also set up a recurring loop that updates the FPS count every second.
Window & Canvas Sizing
Here is our Sizing() function in action that resets the width and height of the window and canvas element, the number of tiles horizontally and vertically on the screen, and the viewport's center. This function is called when the page loads or when the window is resized manually by the player:
function Sizing() {
	config.win = {
		width: window.innerWidth,
		height: window.innerHeight
	};

	config.tiles = {
		x: Math.ceil(config.win.width / config.size.tile),
		y: Math.ceil(config.win.height / config.size.tile)
	}

	config.center = {
		x: Math.round(config.tiles.x / 2),
		y: Math.round(config.tiles.y / 2)
	}

	viewport.x = 0;
	viewport.y = 0;
	viewport.w = config.win.width;
	viewport.h = config.win.height;

	context.canvas.width = config.win.width;
	context.canvas.height = config.win.height;
}
Resetting the canvas size and other pre-defined object variables is crucial to prevent skewing of the game display.
Log FPS and Player Position Data
Let's create a function to log the FPS count and player coordinates to the div container:
function Log(type, text) {
	document.getElementById(type).innerHTML = text;
}
This method accepts two arguments, type, which is the div element with ID fps, which is added in the event you want to add multiple div containers to log data, and the text argument, which is the text data that will output on the screen.
Load the JSON Data
Next, we have a custom function, LoadURL(), that accepts a single argument, url, which is the relative URL to a JSON file within our code, and loads JSON data for our map:
function LoadURL(url, callback) {
	let http = new XMLHttpRequest();

	http.overrideMimeType("application/json");
	http.open("GET", url + "?v=" + new Date().getTime(), true);
	http.onreadystatechange = function() {
		if (http.readyState === 4 && http.status == "200") {
			callback(http.responseText);
		}
	}
	http.send(null);
}
If the JSON data is found and parsed correctly, it's returned to the originating process using the callback method.
The Game Loop
And now we get to the game loop in the Loop() function, a custom method that loops within itself using the window.requestAnimationFrame() method to handle animations of the player and map within the canvas element:
function Loop() {
	window.requestAnimationFrame(Loop);

	Sizing();

	viewport.center();
	map.draw();
	player.draw();

	if (!fps.last) {
		fps.last = Date.now();
		fps.count = 0;
	}

	let delta = (Date.now() - fps.last) / 1000;
	fps.last = Date.now();
	fps.count = Math.round(1 / delta);

	Log("fps", "FPS: " + fps.shown);
}
As the loop continues, the Sizing() method is called to handle any manual resizing of the browser window, so the config values and canvas size are updated accordingly. Not doing this will cause unwanted stretching of the game display.
We continue by re-centering the viewport with viewport.center(), updating the map's on screen position with map.draw(), and updating the player's position and sprite frame with player.draw().
Finally, we run a few calculations to determine the frames per second to display them to the user.
On Window Load
Once the page is loaded and all elements are available in the DOM, we'll call our custom Setup() function that we defined a bit ago to process all the page elements:
window.onload = function() {
	Setup();
};
On Window Resize
If the user resizes the window, our custom Sizing() function is called to recalculate and reposition the window and canvas element size along with the number of tiles on the screen and the viewport's center:
window.onresize = function() {
	Sizing();
};
Map.js
This script handles the loading and drawing of the map using the JSON data pulled from a local file.
The Map Class
Here, we define our Map class and its associated variables:
const Map = function(title) {
	this.data = {};
	this.tiles = [];
	this.timer = setInterval("map.frame()", 750);

	this.load(title);
};this.data: contains the map data loaded from our JSON file.this.tiles: contains pointers to each of the tile images defined in the JSON file.this.timer: loops through themap.frame()function every 3/4 seconds and animates the map sprites, giving the tiles an animated effect and making the map more lively.
Loading the Map
load() is a function within our Map class, accepting a single argument, title, which is the name of the JSON file in title-case format:
load: function(title) {
	LoadURL("assets/json/" + title.toString().toLowerCase() + ".json", function(result) {
		map.data = JSON.parse(result);
		map.data.frame = 0;

		let init = false;
		let loaded = 0;

		for (let i = 0; i < map.data.assets.length; i++) {
			map.tiles.push(new Image());
			map.tiles[i].src = "assets/img/tile/" + map.data.assets[i].file_name + ".png?v=" + new Date().getTime();

			map.tiles[i].onload = function() {
				loaded++;

				if (!init && loaded == map.data.assets.length) {
					init = true;

					Loop();
				}
			};
		}
	});
}
This method loads our map data using the LoadURL() function we defined earlier, loops through each of the unique tile assets, and loads the image files into memory so we can display them in our map.
Drawing the Map to the Screen
Next, our draw() method within the Map class handles painting the map tiles to the canvas element. This is a bit more complicated, so we'll split it up into multiple sections:
draw: function() {
	...
}
There are four variables, x_min, y_min, x_max, and y_max, which determine the starting and ending horizontal and vertical positions of the map relative to the viewport:
let x_min = Math.floor(viewport.x / config.size.tile);
let y_min = Math.floor(viewport.y / config.size.tile);
let x_max = Math.ceil((viewport.x + viewport.w) / config.size.tile);
let y_max = Math.ceil((viewport.y + viewport.h) / config.size.tile);
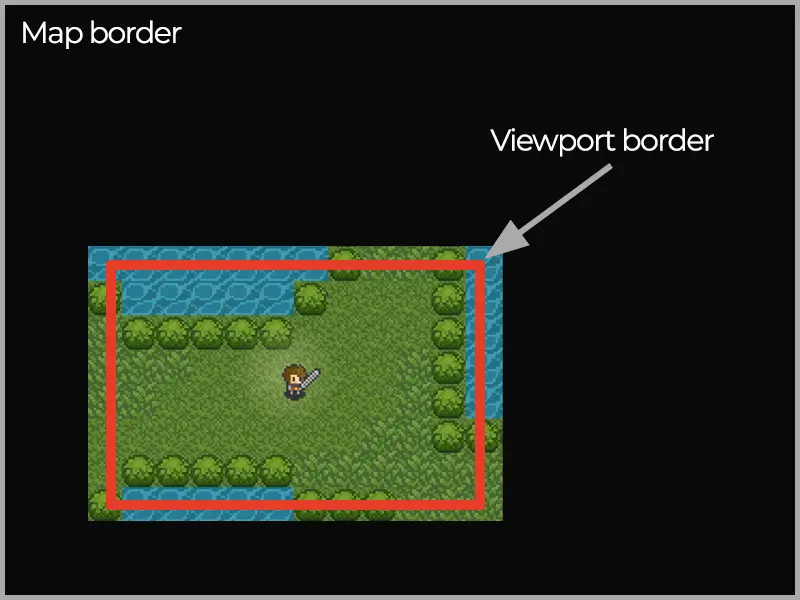
These calculations are made to improve the processing of the player and map animations by cropping out the parts of the map that aren't visible in the viewport. Only the visible tiles are animated. This process is called occlusion culling and can be accomplished in both 2D and 3D environments.
Here's an example screenshot where the area within the red box contains the visible tiles and is output to the canvas element. The rest of the map tiles are omitted from the output, improving the performance of the game and the animations overall:
We then run a few checks to see if the player has hit any of the four edges of the map and adjust our values accordingly:
if (x_min < 0) { x_min = 0; }
if (y_min < 0) { y_min = 0; }
if (x_max > map.width) { x_max = map.width; }
if (y_max > map.height) { y_max = map.height; }
Next, we loop through our viewable tile positions from start to finish and paint them to the canvas element:
for (let y = y_min; y < y_max; y++) {
	for (let x = x_min; x < x_max; x++) {
		let value = this.data.layout[y][x] - 1;
		let tile_x = Math.floor((x * config.size.tile) - viewport.x + (config.win.width / 2) - (viewport.w / 2));
		let tile_y = Math.floor((y * config.size.tile) - viewport.y + (config.win.height / 2) - (viewport.h / 2));

		if (value > -1) {
			let frame = this.data.frame;

			if (frame > this.data.assets[value].frames) {
				frame = 0;
			}

			context.drawImage(
				map.tiles[value],
				frame * config.size.tile,
				0,
				config.size.tile,
				config.size.tile,
				tile_x,
				tile_y,
				config.size.tile,
				config.size.tile
			);
		}
	}
}
As we paint each tile, we loop through the two animated map sprite frames and output to the screen accordingly, giving the tall grass and water sprites that "blowing in the wind" effect with our sprite images.
Sprite Animations
Finally, we have the frame() method that determines which frame of each of the map tile sprites should be displayed, either the first frame or the second frame:
frame: function() {
	this.data.frame = (this.data.frame == 0) ? 1 : 0;
}
Player.js
This script contains everything necessary to load, display, and control the player within the map.
The Player Class
Let's look at the Player class and its associated functions and variables. Here is the class definition, accepting two arguments, tile_x and tile_y, which are the X and Y position of the player relative to the tiles on the map:
const Player = function(tile_x, tile_y) {
	this.timer = setInterval("player.frame()", 125);
	this.frames = [0.40, 0.42, 0.44, 0.46, 0.48, 0.50, 0.48, 0.46, 0.44, 0.42, 0.40];

	this.sprite = new Image();
	this.sprite.src = "assets/img/char/hero.png";

	this.movement = {
		moving: false,
		key: 40,
		frame: 1
	};
	this.pos = {
		x: config.size.tile * tile_x,
		y: config.size.tile * tile_y
	};
	this.tile = {
		x: tile_x,
		y: tile_y
	};
	this.torch = {
		lit: false,
		frame: 0
	};
};this.timer: loops every 1/8 seconds to change the animation sprite frame of the player. These sprite frames are pre-determined in the globalkeysobject'sfarray.this.frames: the player has the option of toggle a torch by pressing theTkey on the keyboard. This variable controls the opacity of the surrounding torch frames. We'll get into this more in a bit.this.sprite: the sprite image frames for the player.this.movement: determines if the player is moving, what key is being pressed, and which animation frame the player is currently on as the sprite is animating.this.pos: the X and Y position of the player on the map in pixels.this.tile: the X and Y tile position of the player on the map relative to the tiles of the map.this.torch: determines if the torch is being used and the opacity of the torch light's edge.
Draw & Update the Player
First, let's explore the draw() function:
draw: function() {
	let frame = (player.movement.moving) ? keys[player.movement.key].f[player.movement.frame] : keys[player.movement.key].f[1];
	let pos_x = Math.round(player.pos.x - viewport.x + (config.win.width / 2) - (viewport.w / 2));
	let pos_y = Math.round(player.pos.y - viewport.y + (config.win.height / 2) - (viewport.h / 2));

	this.light(pos_x, pos_y);
	this.torch_func(pos_x, pos_y);

	context.drawImage(
		this.sprite,
		frame * config.size.char,
		0,
		config.size.char,
		config.size.char,
		pos_x,
		pos_y,
		config.size.char,
		config.size.char
	);
}
Here, the player's frame is determined by whether or not the player is moving, then the position is calculated based on their location on the map relative to the viewport.
Next, we move the player highlight behind the player's new position. The position of the torch is also updated in the event the player toggles the torch on.
Then, we draw the player to the screen and move the map's position, keeping the player centered in the viewport.
Player Highlight
Here, we create a highlight that's visible behind the player. The highlight is just a radial gradient effect added to separate the player from the map to make the player stand out more:
light: function(pos_x, pos_y) {
	let light_x = pos_x + (config.size.tile / 2);
	let light_y = pos_y + (config.size.tile / 2);

	let radius = 100;
	let radialGradient = context.createRadialGradient(light_x, light_y, 0, light_x, light_y, radius);

	radialGradient.addColorStop(0, "rgba(238, 229, 171, 0.325)");
	radialGradient.addColorStop(1, "rgba(238, 229, 171, 0)");

	context.fillStyle = radialGradient;
	context.arc(light_x, light_y, radius, 0, Math.PI * 2);
	context.fill();
}
Torch Lighting Effect
The player has a hidden torch that can be activated and deactivated by pressing the T key on your keyboard. When activated, a large, pixelated gradient effect pulsates and surrounds the player:
To accomplish this effect, the torch_func() method accepts two arguments, pos_x and pos_y, which are the player's X and Y positions on the map. If the torch is lit, we loop through the visible tiles and create a pixelated radial gradient effect around the player, hiding everything else that exceeds the surroundings of the torchlight, providing an eerie lighting effect:
torch_func: function(pos_x, pos_y) {
	if (this.torch.lit) {
		for (let y = 0; y < config.tiles.y; y++) {
			for (let x = 0; x < config.tiles.x; x++) {
				let distance = Math.sqrt((Math.pow(x - config.center.x, 2)) + (Math.pow(y - config.center.y, 2)));
				let opacity = (distance / 4) - this.frames[this.torch.frame];

				context.fillStyle = "rgba(0, 0, 0, " + opacity + ")";
				context.fillRect((x * config.size.tile) - (config.size.tile / 2), (y * config.size.tile) - (config.size.tile / 2), config.size.tile, config.size.tile);
			}
		}
	}
}
Player Sprite Frames
In the frame() method, we loop through the player's movement and torch frames and update accordingly. As the player moves, it steps through each of the frames in regular intervals, making the player appear like they're walking. Once the animation is completed, it loops back to the beginning so the player appears to move in a linear motion.
The torch frames are also controlled here, giving the torch in the player's hand a glowing effect:
frame: function() {
	this.movement.frame++;

	if (this.movement.frame == 4) {
		this.movement.frame = 0;
	}

	this.torch.frame++;

	if (this.torch.frame == this.frames.length) {
		this.torch.frame = 0;
	}

	player.movement.frame = this.movement.frame;
	player.torch = this.torch;
}
Player Movement
The move() method determines the player's movement across the map and adds collision detection for tiles that the player can't walk over. This method accepts two arguments, x and y, which are the player's current position relative to the map, in pixels.
Collisions are determined based on the JSON data when loading the map. Each tile has a collision flag represented by a boolean value. 1 means the player can walk across the tile, and 0 means they can't. As the player moves, their position is updated and a collision check is run.
The player object is updated with the latest coordinates and the player's position is logged to the div element:
move: function(x, y) {
	let pos = {
		x: Math.ceil(this.pos.x / config.size.tile),
		y: Math.ceil(this.pos.y / config.size.tile)
	};

	let new_pos = {
		x: Math.ceil((this.pos.x + x) / config.size.tile),
		y: Math.ceil((this.pos.y + y) / config.size.tile)
	};

	for (let i = 0; i <= 1; i++) {
		let tile = ((i == 0) ? map.data.layout[pos.y][new_pos.x] : map.data.layout[new_pos.y][pos.x]) - 1;
		let collision = map.data.assets[tile].collision;

		if (!collision) {
			if (i == 0) {
				this.pos.x += x;
				this.tile.x = new_pos.x;
			}
			else {
				this.pos.y += y;
				this.tile.y = new_pos.y;
			}
		}
	}

	player = this;

	Log("coords", "Coords: " + this.tile.x + ", " + this.tile.y);
}
Moving the Player with Keyboard Input
The last piece of the player script takes care of event handling. The only two events we have are keydown and keyup, detecting whether a key has been pressed or released so the player can be moved or stopped.
If the player presses any of the four arrow keys, the player.movement.moving flag is set to true, the player's position will update, the player will animate, and the map will move accordingly. This is all done by referencing the pressed key against the keys global object. If the key code matches any of these values, an action is performed by the player.
The active flag, a, determines if that key is currently being pressed. If it is, its value is set to true. This allows the player to move in multiple directions at once, or diagonally, instead of only four directions one at a time.
And, if the T key is pressed, the torch will be lit or extinguished.
document.addEventListener("keydown", function(event) {
	if (event.keyCode >= 37 && event.keyCode <= 40) {
		player.movement.moving = true;
		player.movement.key = event.keyCode;

		for (let key in keys) {
			if (key == event.keyCode) {
				keys[key].a = true;
			}
		}
	}
	else {
		switch (event.keyCode) {
			case 84:
				player.torch.lit = (player.torch.lit) ? false : true;
				break;
		}
	}
});
When an arrow key is released, the global keys object is looped to see if any remaining keys are pressed. If none remain, the player.movement.moving flag is set to false, meaning the player is no longer moving.
document.addEventListener("keyup", function(event) {
	let found = false;

	for (let key in keys) {
		if (key == event.keyCode) {
			keys[key].a = false;
		}
	}

	for (let key in keys) {
		if (keys[key].a) {
			player.movement.key = key;
			found = true;
		}
	}

	if (!found) {
		player.movement.moving = false;
	}
});
Viewport.js
The last class we'll cover is the Viewport class, available to keep the viewport positioned and centered with the player at all times.
Here is a quick look at the Viewport class:
const Viewport = function(x, y, w, h) {
	this.x = x;
	this.y = y;
	this.w = w;
	this.h = h;
};
The variable assignments are as follows:
this.x: top-left position of the viewport on the x-axis.this.y: top-left position of the viewport on the y-axis.this.w: width of the viewportthis.h: height of the viewport
Keeping the Viewport Centered
The following code snippet determines the player's position based on its movement, calculates its width and height in pixels, and divides it by two to capture the center of the viewport's position. The viewport's position is updated as the player moves, keeping the player centered on the screen at all times:
Viewport.prototype = {
	center: function() {
		let move_x = 0;
		let move_y = 0;

		let center_x = player.pos.x + (config.size.char / 2);
		let center_y = player.pos.y + (config.size.char / 2);

		for (let key in keys) {
			if (keys[key].a) {
				if (keys[key].x != 0) {
					move_x = keys[key].x;
				}

				if (keys[key].y != 0) {
					move_y = keys[key].y;
				}
			}
		}

		player.move(move_x, move_y);
		viewport.scroll(center_x, center_y);
	},
	scroll: function(x, y) {
 	this.x = x - (this.w / 2);
 	this.y = y - (this.h / 2);
 	}
};
Conclusion
That was a deep dive into creating a 2D tile-based game with JavaScript. I really hope you had fun and learned something new as you followed along through the examples.
You can download or clone the full codeset from the GitHub repository. Feel free to play around with the code and turn it into something unique!
If you have any questions or comments, leave them in the comments section below, and make sure to subscribe to the newsletter for more coding updates!
Written by: J. Rowe, Web Designer & Developer
Last Updated: March 18, 2024Created: January 31, 2023