JavaScript Equalizer Display with Web Audio API
 JavaScript
 In this example, we'll be creating a JavaScript equalizer display, or spectrum analyzer, that utilizes the Web Audio API, a high-level JavaScript API for processing and synthesizing audio. We'll also be using HTML and CSS to polish off our example.
The HTML Elements
Let's get started by creating a short HTML snippet containing the objects we'll use to hold and display the required elements:
<div id="player">
	<div id="audio"></div>
	<canvas id="canvas"></canvas>
</div>
Our layout contains one parent element and two child elements within that parent:
- The
playerelement is our wrapper for our equalizer. Here, we'll define the size and positioning of the equalizer on screen. - The
audioelement is the container for the audio object that we'll be creating shortly and injecting into this container and will be the music player that controls the equalizer bars. - The
canvasobject will be our graphical display of the equalizer bars.
The CSS Snippet for the Background and Audio Player Container
Next, we'll define the styling for the elements we just created above:
body {
	background: black;
	padding: 0px;
	margin: 0px;
}

div#player {
	width: 80vw;
	height: 60vh;
	background: black;
	margin: 20vh auto 0px auto;
	display: block;
}
With this CSS code, we're setting the padding and margin values to 0px on all sides of the body container so the black background will stretch across the entire browser viewport.
You could also set this value to0instead of0px. I've only done it this way out of habit and believe it's more readable but either way will present the same results.
The player element size is set to 80% of the viewport width and 60% of the viewport height. You could set this to any size you'd like. These are just the values we'll be using in this example.
If you launch the code in a browser window at this state, the only thing you'll see a black screen. This is because we still need to create our audio element as well as invoke the Web Audio API.
Building the JavaScript Equalizer Display with the Web Audio API
The JavaScript portion of this example is where the beauty lies. First, let's get our variable declarations out of the way:
var canvas,
	ctx,
	source,
	context,
	analyser,
	fbc_array,
	bar_count,
	bar_pos,
	bar_width,
	bar_height;
Some of these are self-explanatory as you dive into the code a bit further, but I'll define what each of these variables is and what they'll be used for:
canvas: A pointer to the canvas element we created in our HTML snippet above that will hold the display of the equalizer bars.source: This is a pointer toAudioContextinterface used when creating a newMedia Element Audio Source Nodeobject, which means a pointer to our audio element we'll be creating in a bit. This is a main part of the Web Audio API that we'll be tying into.context: A pointer to theAudioContextinterace of the Web Audio API.analyser: This is a normalized array of values between 0 and 255 that uses a mathematical process called a Fast Fourier Transform (FFT) to provide real-time curves of all the frequency components in the incoming signal. This value is half the size of thefftSizeproperty, which represents the window size in samples used to get frequency domain data.fbc_array: stores the frequency domain data in an array.bar_count: The number of bars to display in our canvas element.bar_pos: The x-axis position of the current bar being drawn to the canvas element.bar_width: The width of the current bar being drawn to the canvas element.bar_height: The height of the current bar being drawn to the canvas element.
Next, we'll create our audio element:
var audio = new Audio();

audio.id = "audio_player";
audio.src = "[relative-mp3-file-location]";
audio.controls = true;
audio.loop = false;
audio.autoplay = false;
Here, we're creating a new audio element using JavaScript which we're storing in memory. We've set to show the audio controls so we can play and pause the audio file as we please. We're not looping through the audio file each time it completes and we're not automatically playing the audio file when the screen finishes loading. You can change these values to anything you'd like without negatively affecting the equalizer display.
Make sure to change the audio.src location to the relative location of any MP3 file you wish to use. If you set this value to a URL, you may come across issues with playback and Cross-Origin Resource Sharing (CORS). Make sure it's an audio file you have complete access to so you can avoid these types of issues.Next, we'll be setting up our canvas and audio elements as well as initializing the Web Audio API. This code will be generated using a load event handler against the window object which means this code will not be executed until all elements within the page have been fully loaded:
window.addEventListener(
	"load",
	function() {
		document.getElementById("audio").appendChild(audio);

		document.getElementById("audio_player").onplay = function() {
			if (typeof(context) === "undefined") {
				context = new AudioContext();
				analyser = context.createAnalyser();
				canvas = document.getElementById("canvas");
				ctx = canvas.getContext("2d");
				source = context.createMediaElementSource(audio);

				canvas.width = window.innerWidth * 0.80;
				canvas.height = window.innerHeight * 0.60;

				source.connect(analyser);
				analyser.connect(context.destination);
			}

			FrameLooper();
		};
	},
	false
);
Let's break down each of these pieces to get a better understanding of what's going on.
Here, we're taking our audio object that we created in our JavaScript snippet above and placing it in our audio HTML div element so we can view and control the audio playback.
document.getElementById("audio").appendChild(audio);Now, we need to create an event handler for our new audio element. We're doing this after the window loads and the audio element is created to prevent console errors:
document.getElementById("audio_player").onplay = function() {
	...
};
We'll also ensure that AudioContext has not been initialized yet to allow for pausing and resuming the audio without throwing a console error:
if (typeof(context) === "undefined") {
	...
}
Now, we'll need to use many of the variables we defined above as our pointers to the libraries and objects we'll be interacting with to get our equalizer to work (definitions for each in the list above). This will be done within our audio element onplay event handler:
context = new AudioContext();
analyser = context.createAnalyser();
canvas = document.getElementById("canvas");
ctx = canvas.getContext("2d");
source = context.createMediaElementSource(audio);
Next, we need to define the size of our canvas element. Sizing a canvas element using CSS isn't enough. The element generally ends up scaling to a larger size which would distort the final visual output. So, to prevent this from happening, we'll define a fixed size with a calculation equaling to the size we defined to the player element in our CSS code above:
canvas.width = window.innerWidth * 0.80;
canvas.height = window.innerHeight * 0.60;
The following connect() method connects our analyser pointer to our audio context pointer source then that pointer to the context destination. This is how we'll read the frequency data to be displayed to the canvas element in the next section.
source.connect(analyser);
analyser.connect(context.destination);
Finally, we'll call our custom FrameLooper() method which we'll also create in the next section. This method will handle the animation and output of the equalizer to our canvas object:
function FrameLooper() {
	window.RequestAnimationFrame =
		window.requestAnimationFrame(FrameLooper) ||
		window.msRequestAnimationFrame(FrameLooper) ||
		window.mozRequestAnimationFrame(FrameLooper) ||
		window.webkitRequestAnimationFrame(FrameLooper);

	fbc_array = new Uint8Array(analyser.frequencyBinCount);
	bar_count = window.innerWidth / 2;

	analyser.getByteFrequencyData(fbc_array);

	ctx.clearRect(0, 0, canvas.width, canvas.height);
	ctx.fillStyle = "#ffffff";

	for (var i = 0; i < bar_count; i++) {
		bar_pos = i * 4;
		bar_width = 2;
		bar_height = -(fbc_array[i] / 2);

		ctx.fillRect(bar_pos, canvas.height, bar_width, bar_height);
	}
}
And now we'll break this final method down into parts to fully understand how our animations and output are being handled.
The following snippet creates a callback to the FrameLooper() method, repainting the canvas output each time there's an update:
window.RequestAnimationFrame =
	window.requestAnimationFrame(FrameLooper) ||
	window.msRequestAnimationFrame(FrameLooper) ||
	window.mozRequestAnimationFrame(FrameLooper) ||
	window.webkitRequestAnimationFrame(FrameLooper);
The RequestAnimationFrame object looks for a compatible request animation frame object based on the user's current browser type. If one is found, it sets a callback to our FrameLooper() animation method so the frequency data is pulled and the canvas element is updated to display the bars in real-time.
Next, we're assigning the returned frequency data array to the fbc_array variable so we can use it in a bit to draw the equalizer bars and the bar_count variable to half the window's width:
fbc_array = new Uint8Array(analyser.frequencyBinCount);
bar_count = window.innerWidth / 2;
The bar_count value can also be set to whatever you want. I set it to half the window width to ensure there are enough bars to fill the content area.The next bit takes the fbc_array data and stores it in the analyser pointer:
analyser.getByteFrequencyData(fbc_array);
Next, we'll clear our canvas element of any old visual data and set the fill style for our equalizer bars to the color white using the hexadecimal code #ffffff:
ctx.clearRect(0, 0, canvas.width, canvas.height);
ctx.fillStyle = "#ffffff";
And, finally, we'll loop through our bar count, place each bar in its correct position on the canvas' x-axis, calculate the height of the bar using the frequency data array fbc_array, and paint the result to the canvas element for the user to see:
for (var i = 0; i < bar_count; i++) {
	bar_pos = i * 4;
	bar_width = 2;
	bar_height = -(fbc_array[i] / 2);

	ctx.fillRect(bar_pos, canvas.height, bar_width, bar_height);
}
Conclusion
Whew! There sure is a lot going on in this example, but the result is worth it:
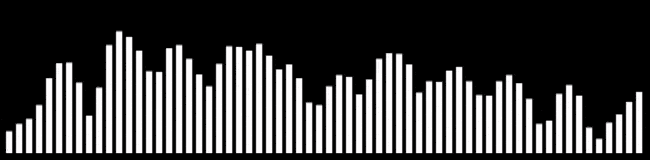
I promise it won't seem so overwhelming once you play around with the code a bit.
You can find the full JavaScript equalizer display example on our GitHub page.
Written by: J. Rowe, Web Designer & Developer
Last Updated: June 05, 2022Created: March 10, 2020