Web Push Notifications with Push API in JavaScript
 JavaScript
 Push notifications are popular for mobile applications that want to keep their users informed of updates, incoming messages, and more. They've been popular since the release of smartphones and will continue to play a major role in mobile applications for a long time ahead.
Another feature, web push notifications, allows users to receive and display real-time notifications within their web browsers with a little bit of JavaScript code and the Push API.
This tutorial will cover what web push notifications are and how to set them up within a website or web application.
What Are Web Push Notifications?
Web push notifications are real-time notifications submitted to a user's desktop or mobile browser through either a server-side application or web push service. These types of notifications can be used to engage or re-engage a user in a website's content or provide personalized messages, notifications, or alerts.
Web push notifications generally pop up from the right side of the screen, either the top-right or bottom-right, on desktops and from the top of the screen on supported mobile devices, depending on the user's browser and device or operating system.
Here, we'll walk through Google Firebase to set up our project required for sending web push notifications, and create some JavaScript code using the Push API. Finally, we'll create an HTTP request to generate our own custom push notifications.
Setting Up Web Push Notifications
Step 1: Set Up a Google Firebase Project
If you don't have a Google account, you'll need to set this up first. If you do have a Google account, make sure you're logged in so you can proceed.
First, we'll create a Firebase project in the Google Firebase Console.
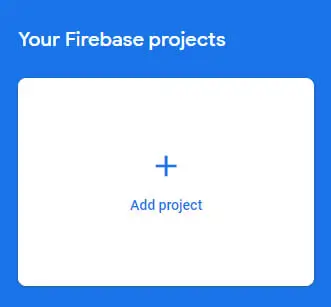
Project creation is easy. Click on the big "+ Add Project" button from the Firebase console:
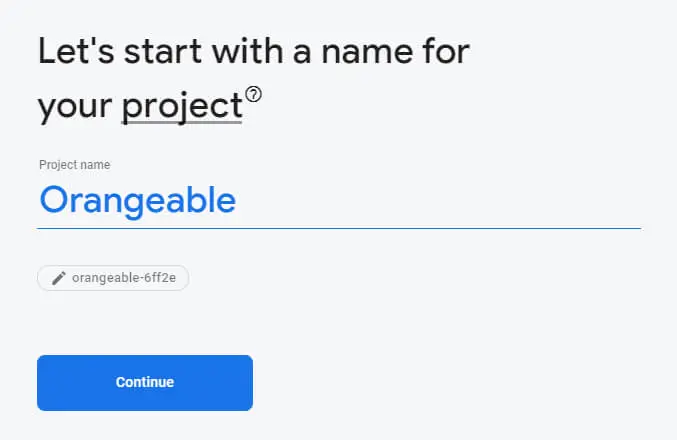
Give our project a name:
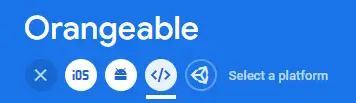
Once the project is created, we'll need to add a web platform:
And then provide a name for our platform. This can be the same name as our project to keep things consistent:
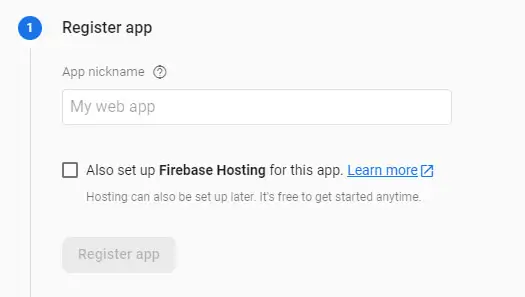
Finally, click the "Register App" button to create our new web platform within our Firebase project.
Step 2: Generate A Vapid Key
A Vapid key, or Voluntary Application Server Identification, is required to subscribe to push notifications and send requests through supported web services.
You can generate a Vapid key straight from the Google Firebase console by navigating to Project Name > Project Settings > Cloud Messaging and scrolling to the Web Configuration section at the bottom of the screen.
Then, click the Generate Key Pair button to generate your new Vapid key:
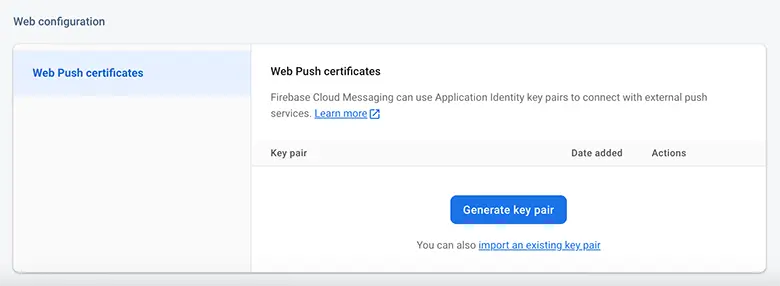
Save this key for later. We'll need it for generating web push tokens in our code.
Step 3: Create the Service Worker File
The service worker file is needed to register the Firebase dependencies for notification initialization and handling, and for background notification event handling when the browser window is closed or inactive.
Create a file named firebase-messaging-sw.js that is placed in the root directory of our website.
In the file, we need to import the required Firebase dependencies using JavaScript's importScripts() method:
importScripts("https://www.gstatic.com/firebasejs/x.x.x/firebase-app-compat.js");
importScripts("https://www.gstatic.com/firebasejs/x.x.x/firebase-messaging-compat.js");
The JavaScript file versions are redacted from the paths. You can find the latest script versions here.
Next, we need to define our Firebase configuration variables using the values provided from the Firebase console, and then initialize Firebase. This is just an example. The code you need can be copied and pasted from your Firebase configuration as it will contain the correct keys and IDs for your project:
var firebaseConfig = {
	apiKey: "xxxxxxxxxxxxxxxxxxxxxxxxxxxxxxxxxxxxxxx",
	authDomain: "auth.domain.com",
	databaseURL: "https://authdomain.firebaseio.com",
	projectId: "authdomain",
	storageBucket: "authdomain.appspot.com",
	messagingSenderId: "0123456789",
	appId: "1:0123456789:web:xxxxxxxxxxxxxxxxxxxxxx",
	measurementId: "G-XXXXXXXXXX"
};

firebase.initializeApp(firebaseConfig);
Finally, we need to create a firebaseMessaging object and onBackgroundMessage() method for background badge count retrieval and display. The badge count is an optional thing, but useful for your users when they want to know if they have new notifications before opening your web app.
const firebaseMessaging = firebase.messaging();

firebaseMessaging.onBackgroundMessage(function(payload) {
	if ("setAppBadge" in navigator) {
		navigator.setAppBadge(payload.apns.payload.aps.notification_count);
	}
});
Step 4: Initialize Firebase in Our Website
Now, we'll initialize Firebase within our website for foreground message handling. Foreground messaging allows our web browser to receive real-time notifications when our web browser is active, or in the foreground.
Create a JavaScript file named push.js and place it in the root directory of your website. This is where we'll work with all client-side code related to web push notification handling.
First, we'll need to include the script from our HTML code as a module type. This is required when working with web push notifications through Firebase:
<script type="module" src="/push.js"></script>
Second, we need to include our Firebase dependencies. These files should always be included before any other Firebase-specific functions. Just make sure to replace the version numbers to the same versions in the service worker file above:
import { initializeApp } from "https://www.gstatic.com/firebasejs/x.x.x/firebase-app.js";
import { getMessaging, getToken, onMessage } from "https://www.gstatic.com/firebasejs/x.x.x/firebase-messaging.js";
Third, we'll initialize Firebase from the frontend:
const firebaseApp = initializeApp(firebaseConfig);
const firebaseMessaging = getMessaging(firebaseApp);
And, fourth, we'll create a variable named registration we'll use to hold our service worker registration data and register the service worker. This is required to send web push notifications as needed:
var registration = null;

if ("serviceWorker" in navigator) {
	navigator.serviceWorker.register("/firebase-messaging-sw.js").then(function(reg) {
		registration = reg;
	});
}
Step 5: Request Permissions
Before sending web push notifications, we'll need to request permissions. Let's create a custom function that will handle this functionality:
function PushPermission() {
	return new Promise(function(resolve, reject) {
		const permissionResult = Notification.requestPermission(function(result) {
			resolve(result);
		});

		if (permissionResult) {
			permissionResult.then(resolve, reject);
		}
	}).then(function(permissionResult) {
		if (permissionResult === "granted") {
			PushSubscribe();
		}
		else {
			throw new Error("We weren\'t granted permission.");
		}
	});
}
Here, we've created a custom function called PushPermission() that accepts no parameters. This function can be called whenever you want to request web push permissions from your users.
As a quick overview, we've created a promise that will either return an acceptance or rejection. A permission request is generated for the user in their browser window using the Notification.requestPermission() method from the Push API and passing the result through our permissionResult variable. If they grant permissions, we call another custom function PushSubscribe() that we'll cover shortly. Otherwise, an error will throw confirmation permissions were denied by the user.
The permission request will generate a native popup that looks like this:
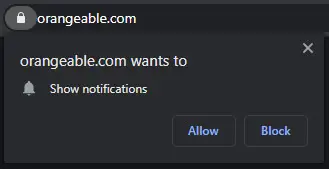
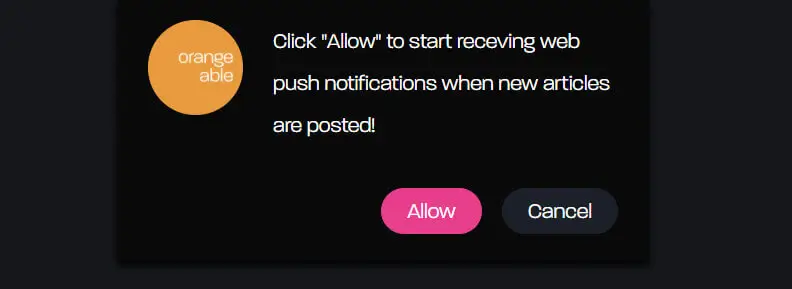
However, it's best practice to show a more user-friendly version of the permissions you're requesting before showing this native popup. This is something that you can customize on your own, providing some details about what the user is subscribing and agreeing to and what types of notifications and frequency of notification submissions they should expect. The native popup is still required. This just gives your users more of a heads-up on what you're requesting of them and what to expect:
Step 6: Register a Web Push Token
Once the user has accepted the permissions, we'll generate a token for them. This token is a user's unique ID that Google Firebase will need when sending direct push notifications.
function PushSubscribe() {
	getToken(firebaseMessaging, { vapidKey: "[vapid-key]" })
		.then(function(token) {
			if (token) {
				...
			}
		}).catch(function(error) {
			console.error(error);
		}
	);
}
Here, we've created another custom function named PushSubscribe() that handles the token generation and subscribes the user to notifications.
We call Push API's getToken() method and pass in our firebaseMessaging instance and our vapid key we created in our Firebase Console project earlier. If a token is returned, we can do whatever we need with it. We'll need to reference it later when sending push notifications, so I'd recommend storing the token in a database or somewhere on your server where you can get to it.
Step 7: Create a Foreground Notification Event Handler
Next, we'll need a way to handle incoming notifications when the browser window is in the foreground, or when a browser tab is active.
We'll reference the firebaseMessaging instance again to assign an onMessage event handler, which will listen for any incoming messages in the foreground:
onMessage(firebaseMessaging, function(payload) {
	return registration.showNotification(
		payload.notification.title,
		{
			body: payload.notification.body,
			icon: "/icon-512.png"
		}
	);
});
The event handler returns one parameter, payload, containing the data we'll use to display in the user's notification popup on their screen using the payload data provided in the notification data.
We'll reference the registration instance created from our service worker and call the showNotification() method to display the notification to the user. In this example, we're passing the payload notification data and any options that may exist for display and user interaction, including a custom 512x512 pixel icon. This icon can be anything, but typically is a logo.
Step 8: Send A Web Push Notification
Once a user has accepted web push permissions, and a valid token has been generated and stored somewhere on the server, they can begin receiving notifications.
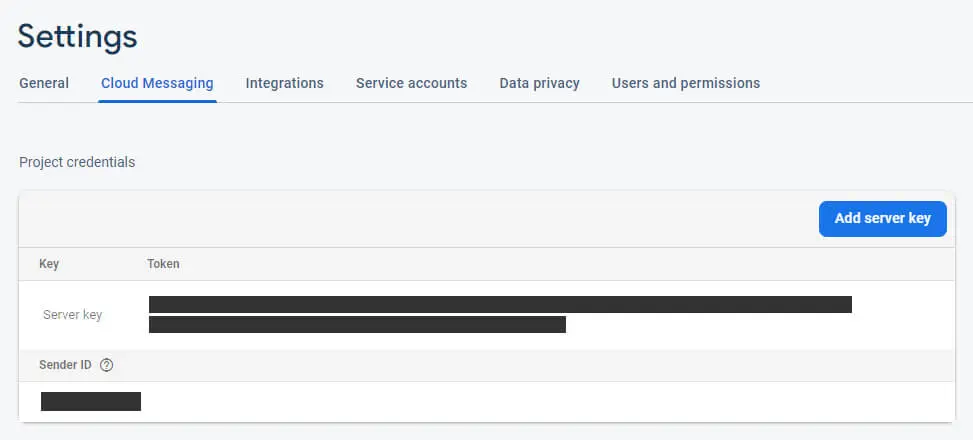
Now, we'll need our Firebase server key to grant authentication from Google's services to submit the notifications via FCM. The Firebase server key can be found in Firebase under Project Settings > Cloud Messaging, then grab the Server Key value:
Next, we'll generate web push notification with a user token using cURL:
curl --request POST 'https://fcm.googleapis.com/v1/projects/[project-app-id]/messages:send'
	--header 'Authorization: Key=[firebase-server-key]'
	--header 'Content-Type: application/json'
	--data-raw [payload]
Here is the minimal payload data needed to send a web push notification:
{
	"message": {
		"token": "[user-token]",
		"notification": {
			"title": "Title here",
			"body": "Body text here"
		}
	}
}
You can expand native push notifications for iOS and Android devices or add notification click details with additional payload data:
{
	"message": {
		"token": "[user-token]",
		"notification": {
			"title" => "Title here",
			"body" => "Body text here"
		},
		"apns": {
			"headers": {
				"apns_priority": "5"
			},
			"payload": {
				"aps": {
					"content_available": true,
					"mutable_content": true,
					"notification_count": 1
				}
			}
		}
		"android": {
			"priority": "HIGH",
			"notification": {
				"notification_count": 1
			}
		},
		"webpush": {
			"headers": {
				"urgency": "high"
			},
			"fcm_options": {
				"link": "https://orangeable.com"
			}
		}
	}
}
Successfully received notifications will appear like this:
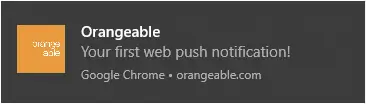
This is a Chrome browser notification. Other browsers and devices may displa these notifications differently, but the overall concept remains the same.
Notification Options
There are four noteworthy options you can use when displaying notifications:
body: Notification description shown below the notification title. This should give the user enough information to decide how to act on the notification. Make it useful to our users or you may miss out on subscription opportunities.icon: Attaches an image to the notification to make it more appealing and relevant to our site and the user. You could make this our site icon, a user profile image, or any other type of image that uniquely identifies our website.vibrate: This one's fun to play around with. Here, you can specify a vibration pattern for a mobile device receiving the notification. This is done using an array of values. For example,[100, 50, 100]would vibrate for 100 milliseconds, pause for 50 milliseconds, then vibrate again for another 100 milliseconds.data: Any additional custom data you would like to pass into the browser when the user clicks on the incoming notification. This is an object that can accept a set of key/value pairs.
Some Useful Tidbits
- The
HTTPSprotocol is required. You can only use web push notifications within a secure connection. Learn how to secure your website with HTTPS here. - It's better to use a custom popup with a friendly message and details about what they'll be subscribing to versus just showing the native "Allow" or "Block" popup in the corner initially. Doing so can help gain user trust and give them a heads up of what they're subscribing to ahead of time, allowing them to make a more informed decision. It may be a good idea to include the notification frequency; how many times we'll be submitting notifications per day, week, or month.
- If you're going to implement this feature, it's best to use a timed popup delay or wait until the user has scrolled down a certain amount on our web page before showing them a popup. There's nothing worse than visiting a web page and getting bombarded with tons of popups and flyouts on the get-go. Make sure to keep our user's best interests in mind.
Browser Support
Chrome, Firefox, Opera, Edge, and Safari support web push notifications on desktop devices.
Notifications in Chrome for Android and Safari for iOS as of v16.4 are also supported.
The notifications will vary in appearance and position between the different browsers and operating systems.
Conclusion
Now you are familiar with the ways of implementing web push notifications with JavaScript and the Push API.
They are a fantastic solution to keeping our users informed of new content or updates within our website or web application.
Just remember to keep your user's best interests in mind when implementing this feature. Don't spam them with needless messages. And make sure permission requests and popups aren't providing an overall bad user experience.
Written by: J. Rowe, Web Designer & Developer
Last Updated: September 01, 2023Created: January 08, 2021